Tuesday, February 24, 2009

a peek into the orchard

here is my orchard! i have over 40 trees and as you can tell i am following the backyard orchard culture as pontificated by ed laivo at dave wilson nursery.

the picture gives a pretty good account of the layout as well as the drip irrigation setup to keep the trees watered.

I have mounded mulch around the base of the trees to help maintain ground moisture and also improve the conditions of the poor soil i have in diamond springs.

a bed has been made


well, here you have it - a finished bed. this particular bed is 10 feet in length and will hold approximately 2 yards of soil

you will notice the nickel wires connected between the long sides of the bed - this is my attempt to stiffen the trex - in the event that summer temperatures soften the trex enough to flex and bow it out of shape.

the bottom of the bed is lined with chicken wire to keep out any gopher or mole type critters. although, i havent seen any on my property, i figured now was time to line the bed. could you imagine having to dig out the dirt to line the bed if i did it later? each bed has pvc pipe stubbed into it - connecting back to a controller to automate watering during vacations.

down the road, i plan to place 2x4 redwood along the top edges of the trex to finish off each bed. this will also allow a place to sit when working the beds.

the beginning of the beds - some key learnings

in mid november, i went to the big box store and purchased trex to start building the raised beds. i got to admit, it was a long time coming, but these beds getting built meant that i would definitely have at least 1/2 of my garden in raised beds by spring 2009.

my basic bed design is 4 feet wide, with the length varying depending upon location in the garden. the first 6 beds have the following dimensions (in feet): 4x16, 4x15, 4x14, 4x13, 4x12, 4x11 - and there is a 4 foot walkway between each bed and each bed will be 11 inches deep.

trex has a few quirks that i learned about once i started working with it.

the first quirk i ran into was the flexy nature that trex brings to the table. so getting a straight cut was a challenge. continuing along the lines of flexy, i was concerned that in the summer, the trex would soften a bit and flex more (along the longer side) than optimal - due to the weight of the dirt in the bed. to overcome that flex, i tied the long sides together with wire to limit the outward flex.

the second quirk about trex is its density. after breaking off several screws, i decided pre-drilling was necessary for success. i do recommend the use of screws that were specifically engineered for trex. these screws have a special shaped head, which eliminates the mushing of trex material as the screw is sunk into the board.

shown here is a typical bed that has its first layer prepped. the bed will be getting a second layer of trex to bring it up to its ~11 inch depth.

the corners are buttressed with 4x4 redwood and the planks along the long side of the bed are used to keep the trex layers from separating as well as serving as the mount point for the nickel wire described above.

Sunday, February 22, 2009

2009 seedling update

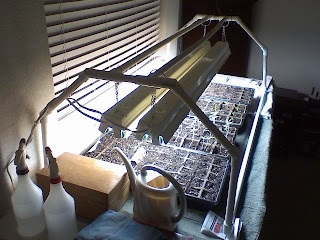
'keith' continues to work hard on our seedlings and he sent me a recent update. as you can see, they are coming along just fine.

'keith' rigged up a pretty cool frame to hold the grow lights - he's keeping this rig on a low budget and i believe he has done a dandy job.

i might even be able to get something like this going some years off - when we get the den cleared out.

Saturday, February 21, 2009

to trex or not to trex, that is the question

late december found most of the infrastructure in place in my garden area. the water line was installed, bringing water to the lower section of the garden; electrical conduit was installed and the fence was in on three sides - so the next thing was to start getting the beds installed. terracing was necessary to level out the slope - but that will be covered in a future post.

i had been pondering what type of material to use for my beds. i never really considered stone or any concrete type material, as my preference had been rough cut redwood 2x12 material and although i hadnt worried too much about pressure treated wood, i didnt want to use it in my raised beds - its longevity probably wouldnt be much better than redwood - and why introduce any issues, no matter how remote into my food chain.

so, i was leaning very heavily on the 2x12 redwood. at about the time i was ready to pull the trigger on my material purchases - a friend of my wife was having her husband replace the wood on her raised beds. and guess what material she had used... thats right 2x12 rough cut redwood. her raised beds had been in use for about 8 years - which is not bad for ground contact wood.

just using the redwood for the beds was the cheapest route for building my beds - but if you calculate the cost of another set of wood 10 years down the road and various schemes to minimize dirt contact with the redwood (such as sealing the wood, lining the interior of it with plastic or tar paper or some other device to keep the dirt from touching the wood) it soon became apparent that using trex would probably be a better investment in the long run than initially thought. also, given the length of the beds i was planning to install (up to 16 feet long) i would have to splice the redwood for every bed on its long side - making for a less than optimum installation of redwood. trex on the other hand came in lengths up to 16 feet - available at the big orange box store not too far from my house.

as the dollar aspect of trex versus redwood started to become clearer, one day i googled 'ground contact trex raised beds' and got a lot of hits; the most useful link that came up that was a link to the gardenpunks website. looking over their experience with trex beds, i shot off an email to katie (the gardenpunk queen) and over the series of emails asking about trex as a raised bed material, i was pretty sure i would be using trex for my beds.

the orchard expands in 2009

winter of 2008 saw me digging a bunch more holes in preparation for new bare root trees arriving for my orchard. i previously mentioned my use of 'backyard orchard culture' - as outlined by ed laivo of dave wilson nurseries, - check it out so you understand high density planting ideas. my trees arrived just before new years weekend - which allowed plenty of time to get the trees in.

i had a few trees die over the previous year, but they were still under warranty from the frontyard nursery, so with those replacements i had around 22 holes to dig.

new tree varieties planted in the orchard in 2009 include:

spice zee nectaplum, van cherry, bing cherry, craigs crimson cherry, cot-n-candy aprium, splash pluot, howard miracle plum, tri-lite peach/plum, golden nectar plum, arctic queen nectarine, arctic start nectarine, snow queen nectarine, flav-r-grenade pluot, flavor delight aprium, arctic glow nectarine and pink satin pomegranate.

you may notice some odd names of the fruit - pluots, apriums, nectaplums, etc. these are plants developed by zaiger genetics - and exclusively marketed by dave wilson nurseries. most people probably have seen a pluot- the most common in grocery stores are known as 'dinosaur eggs'.

so, going into spring 2009, i have 44 fruit trees in my orchard and still have a few holes left for trees in 2010. future plans for the orchard will be espaliered apple and pear trees along the fence line. this will permit around another 20 or more trees to be added. my plans for apple varieties will be heirloom types which are pretty rare to find. a company 'trees of antiquity', offers a wide selection of trees that can have their histories traced back several hundred years.
heretofore, i have exclusively used dave wilson bare root trees for all of my plantings, but i am seeking rare varieties which dave wilson currently doesnt have in its catalog. root stock varieties from trees of antiquity, is unknown to me, at this point - however my hope is we will find success on these rare apples and hope to have a future filled with abundant harvests. i will let you know!

2009 seeds that we have started

as i mentioned in a previous post, i usually buy tomato starts. primarily for 2 reasons - 1, i am not setup properly to do the seed thing and 2, i could be sure of getting the varieties of tomatoes i wanted. that changed in 2008. i looked for and could not find 'sweet million' cherry tomato and i found sun gold. knowing that i absolutely had to have sun gold in the garden for 2009, wanting to try sweet million and finding a sport of sun gold - sun sugar - i had to ensure my 2009 garden had those varieties.

enter a new hire at the firm where i work. lets call him 'keith' to hide his true identity. soon after he was hired, 'keith' and i intersected on some computing work and in general conversation between troubleshooting we found that we had a shared interest - nay, not an interest - a passion for gardening!

we talked shop - garden shop - and soon found we could help each other out in our gardening endeavors. his gardening space is near zero for the short term, but he had seed starting gear. i have an abundance of space - and no seed starting gear. so a plan was hatched. he would be the seed starter guy and i would grow the plants this year keeping him well equipped with tomatoes throughout the summer.

my order to totally tomatoes rocketed off - across the ether, via the internet and 10 days later we were in business. 'keith' quickly got to work and we had plants shortly there after. as you can see, he has a pretty sweet setup and thanks to his wife's high tolerance for his garden geekiness (my wife has the same trait) we will be ready for transplants in late april.
these are the seeds 'keith' got going
  • sungold cherry tomato
  • sunsugar cherry tomato
  • sweet million cherry tomato
  • jet sonic medium size tomato (free pkt)
  • gemini sweet bell pepper
  • lilac sweet bell pepper
  • purple beauty sweet bell pepper
  • a pepper variety similar to a hungarian pepper (free pkt)
a big shout out to 'keith' for his help and eagerness to raise these seeds. stay tuned for seedling progress.

Friday, February 20, 2009

a surprise cherry tomato variety hits a home run

i use starts for my tomatoes and on my quest to capital nursery to purchase my plants for 2008, i was searching for a variety i had heard rave reports about but ended up with a variety that knocked my socks off.

sweet million is a red cherry tomato which farmer fred holds in high regard. i was unable to find it at any of the nurseries i frequent but in my search for it, i ran across a variety which may be even more important than sweet million - and that variety is called sun gold.

sun gold is a yellow cherry variety and the tag attached to it - described it in a manner that really caught my attention. the tag, however, did not state that if you grow this tomato, it will forever change your perception of cherry tomatoes. that fruit was awesome and i can honestly say that there will be at least one sun gold growing in my garden every year - for the foreseeable future. small, 1/2-3/4 inch bright orange/yellowish tomatoes - in trusses of 10-20 tomatoes cover the plant. the fruit is surprisingly sweet and in my opinion is the ne-plus-ultra for cherry tomatoes.

if you prefer a more toamto-ish/acidic flavor, you might find this isnt the tomato for you. however, if sweetness in a tomato isnt a deterrent - i think you will not be disappointed in sun gold. we at GGG (Garry's Garden Gnus) gives sun gold a 2 thumbs up!

my favorite seed catalogs

every year, around december - i start hitting the websites of the seed companies to sign up for their next catalog. up until this year, i have never purchased any seeds from any of them - but just getting the catalogs in the mail would get my gardening juices flowing. i get quite a bit of catalogs each year, but there are four that stand out - head and shoulders above the rest.

the catalogs pictured are from tomato growers supply, seed savers exchange, totally tomatoes and baker creek. the varieties of seeds in these books are incredible - the layout, pictures and presentation is first class.

this year, i placed my first order and it went to totally tomatoes. i was looking for 3 particular varieties of cherry tomatoes and wanted a single source to limit my shipping charges - there is nothing worse than buying $3 in seeds and paying $5.95 in shipping.

totally tomatoes had timely shipping and reasonable shipping fees. in addition to the seeds, i also took the opportunity to purchase walls-of-water. i utilized their web interface, which proved to be reasonably layed out and serviceable. the seeds arrived within 10 days and included in the order were 2 free seed packets, 1 sweet bell variety and also another medium size tomato variety. i would not hesitate to order from them again.

my second seed order, which hasnt taken place yet, is destined for the seed savers exchange. specializing in heirloom varieties of all manner of seeds - their catalog is the best of them all - and i find myself reading it in the evening, just to survey the beautiful pictures that they include to highlight their produce.

i am still waiting for my 2009 burpee catalog - hopefully it will arrive soon!

Thursday, February 19, 2009

more garden work - spring/summer 2008

after the orchard was planted, immediate need dictated landing a drip irrigation system to the trees, to alleviate the need for me to hand water the new bare root trees. i had just landed water up at the top of the hill, so all i needed to do was 't' off the main line and put drip lines to the trees. this was done by the middle of march and my attention again was directed away from the garden and to landscaping the front yard.

the month of april showed up and part of my garden plan included a fence to help keep the critters out. joe lamp'ls setup on his show (photo courtesy of diy and joe lamp'l) had some good ideas for a fence as well as an electric fence to keep the deer out. deer are an ongoing challenge where i live, so keeping them out of my garden had to be part of the ultimate plan. joes garden had a lot of ideas that were easily adaptable for my situation and other than my higher fence height, i didnt have to do too much modification to make it work for me.

we had a dry spring in '08, so it allowed me to rake up the accumulation of needles that had gathered since my last cleanup. the needles, plus downed limbs made for a huge fire pile, which i burned in march. the day we lit that fire off was a lot fun, my neighbors were a bit surprised how big the fire was - but in the end all was well and burning the stuff saved me a ton of effort and cost to haul it off.

i started installing my garden fence in april and got 3 out four sides completed by fall. in between the fence work, i had several tasks to do, which included uplimbing the huge pine trees to open up more sunlight. I also had to remove 8 trees to open up more space (as well as eliminate a future shading problem). I also had some stump grinding tasks to clear areas for future bed placement. i also had to dig trenches to extend the water down the garden and into the backyard.

an orchard is born...

february of 2008 found me digging 27 holes in the area of my garden dedicated to fruit trees. i obtain my trees from my local nursery, the front yard nursery (fyn), in el dorado. i order the varieties i want and get them as bare root trees. not only are bare root trees cheaper, but there is better success rate from using bare root tree's rather than ones purchased in pots.

fyn gets its bare root trees from the grower - dave wilson nurseries, if you dont know what bare root trees are check out the dave wilson website.

dave wilson provides first class trees, grafted on to the proper root stock for our area. now how, you ask, do i fit 27 fruit trees in my area? although bigger than my old garden, it certainly is not a large orchard. well, ed laivo from dave wilson has some strategies for keeping fruit trees smaller and thus allowing normal backyard growers the opportunity to have many trees with successive ripening with multiple varieties. the concept is known as backyard orchard culture - get on their website to check it out.

well, if you read about backyard orchard culture, you get an idea of what i am doing. i will keep my trees between 5-6 feet tall and they are staggered in the area to allow enough room for decent lateral space. trees i planted in 2008 include:

royal rainier cherry, lapins cherry, rainier cherry, black tartarian cherry, utah giant cherry, sweetheart cherry, sun burst cherry, juneglo nectarine, arctic jay nectarine, heavenly white nectarine, puget gold apricot, earli autumn apricot, liz's late nectarine, arctic blaze nectarine, autumn glo apricot, pink lady apple, granny smith apple, emerald beaut plum, dapple dandy pluot, emerald drop pluot, warren pear, golden delicious apple, santa rosa plum, flavor king pluot, flavor queen pluot, sauce zee nectarine and arctic rose nectarine.

as you can tell, i have a thing for cherries and nectarines. following ed laivo's directions - in addition to summer pruning, i prune back about 2/3 of the growth on each tree, in late december/early january.

my orchard isnt stopping there - i have enough room for many more trees that will be planted in winter of 2009 - stay tuned.

2008 - the year of the garden

the title gives it away. while there are still projects elsewhere in the yard, that would get my attention in 2008 - the future garden area would finally be getting a slice of my time and progress would be made.

but, it would be a, while - a long while before the first bed would be seen.

even with the manzanita cleared out (see previous posts) there was a lot of prep work - aka infrastructure - to get in place before even one bed could be layed out. may as well start at the beginning....

my backyard is up on a hill AND there is no water stubbed out up there. the last few years, i have been watering my tomatoes via a 150 foot hose - strung up the hill - this would have to change for a full fledged garden; as well as (drum roll please) my orchard! thats right, i have a penchant for fruit trees and my area was big enough for trees and veges. more on the fruit trees later.

so, with jack hammer in hand - i trenched my way up the hill, getting to the top. in addition to the 1 inch water line - i was also running conduit in the trench to get electricity into the back yard. trust me you want to make as much use of a given trench as possible - digging isnt a task i enjoy too much. oh, these trenches were dug by hand, i.e a jackhammer and shovel work - no ditch witches, trenchers etc - i had a budget that couldnt afford $200 to rent those labor saving devices; no matter how much time they would have saved. we have water - whats next?

2007 - a decent tomato season and an idea is born

2007's tomato season turned out to better from a couple of aspects. there was no improvement in the garden area, as 2007 was dedicated to the completion of the front yard landscaping - but taking the ques from 2006, i planted 12 tomato plants and did so in amended holes.

what a world of difference....

production was pretty good, i tended to be a bit heavy on heirloom varieties, this year, thus my numbers werent as big as they could be - but i did now know that with properly amended soil, i could get a decent crop of tomatoes. as for varieties - i didnt write them down, but henceforth will do so in this blog. and i will also be sure i have plenty of tried and true hybrid varieties to off-set unpredictable heirloom production.

this was the year that i saw a garden setup that i knew was for me. historically, my garden has performed yeoman duty - producing well in the summer, but when fallow it was an eyesore. that summer, i found a program called 'fresh from the garden', hosted by joe lamp'l on the diy network.

he had a garden, based upon raised beds that produced well and was pleasing to the eye. raised beds solved 2 of my problems - eye appeal and better soil. in addition, he had several good ideas on how to setup various types of trellises that will be handy in my garden.

now that i had an idea of what i was going to do, i would have some to time to let the ideas stew up in my noodle - and like stew, pizza, chili - ideas - seem to get better over time, as i think out problems and more importantly opportunities in my head. things i pondered about - what to make the beds out of, layout of the beds, sizes, how to overcome my slope and much, much more.

and now a word from our sponsor....

not really. i have no sponsors, except my wallet and my wife - who puts up with way more from this garden geek than she should.

i did want to do a shout out to farmer fred hoffman, local gardener guy on the radio every sunday from 830 am to noon, starting on 1530 AM (kfbk) and moving over to 650 AM (kste) at 10 am. i love his show, its fun to listen to (especially when he and darcy paulin go at it) and at times, find i actually pick up a thing or ten to file away in my brain somewhere.

in case you are listening during the garden grappler (the prize section of the show on kste) and hear a 'garry from diamond springs' - thats me! i have been the big prize winner twice and smaller prize winners several other times. listen to fred, i bet you would enjoy it.

2006 in a nutshell

thats right, my garden layed unattended from january 2006 until spring 2008. well, for the most part.

2006 saw my first attempt at growing tomatoes in my future garden area. i wanted to test the area and see what it could do. i had good luck in cameron park and figured diamond springs wouldnt be an issue.

wrong!

as previously mentioned, the soil in diamond springs is whitish, porous and of volcanic origin. its pretty porous, easy digging in the winter, hard as concrete in the summer. undaunted, i planted my first 6 tomato plants in the new garden in may 2006. i used the existing soil, with no amendments. i wanted to see what the soil could do and boy was i disappointed.

i approached the watering like i did at the old house, about 2 times a week with heavy deep watering. turned out to be grossly insufficient for the type of soil i was dealing with at the new house. 2006 turned out to be a learning curve year for me - it also got me thinking what i could do to improve my future garden - hauling in tons of amendments to fix the soil that was there, was not an appealing solution. i needed to noodle on a feasible fix for my poor soil conditions.

surprise! - we can now see our neighbors

with the manzanita patch cleared, my wife was none too happy to discover that she was able to look right through - what used to be a manzanita patch - and now see the neighbors house. i basically ruined a view she enjoyed since we moved into the house. undaunted, i quickly replied - 'but, honey - thats where my - uh, er Our!, garden is going.'; needless to say, that didnt do too much to help out the situation.

and i could not replant the manzanita..... so there was only one way to go.... and that was forward.. albeit slowly.

we are now into november/december 2005. all project money had been tapped- so times like that require me to continue to look for no cost projects at the house. this meant i was going to be raking up the ~6-7 inches of tree fall/pine needles/manzanita flotsam in my future garden area. ( i just mentioned the word 'garden', so in case you think i forgot this was a garden blog, i am keeping it relevant). this cleanup took many weeks as i was hindered by poor weather, short days, holidays, etc. but by the first of the year (2006), the site was generally clean and ready for the next stage. which wouldnt occur until 2008!

the first summer - part 3

the shed is now done and my attention turns to my future garden area. my backyard is on a, roughly southward facing slope with tall pine trees, a big oak tree and a pretty thick patch of manzanita. after noodling on the best spot for the future garden, i decided it needed to be up on the higher portion of the slope - right where the thicket of manzanita was growing.

my backyard is pretty much been wild land until i was called in to tame it, there was a thick mat of pine needles and accumulated tree fall that covered my future garden area. one would think that this would be prime ground from so many years of decomposition - but alas - it wasnt meant to be. using my grandfather's chainsaw (thanks pa!) - i cut out the manzanita, hauling off the limbs for shredding - what can be shred, and saving the larger limbs for smoking wood. (if any of you smoke salmon or jerky - manzanita is awesome, its a fruit wood, its hard and is all i use and best of all usually free!)

next came the pulling of the manzanita trunks. fortunately, i have a 4x4, 3/4 ton pickup truck - this permitted me to wrap chain (thanks again pa!) around the trunks, connecting the chain to my truck and with a quick pop - most of the trunks came out pretty easy. i was surprised how shallow rooted manzanita - in general were. with the trunks now cleared i could get the into the area and start clearing the ground for my garden. at this point, i hadnt realized raised beds were in my future - but there was still quite a bit of work before i could even plant anything in the ground. winter of 2005/2006 was starting, as my sabbat came to an end and at the end of october, i had to head back to work.

the first summer - part 2

i promise, this blog will eventually get to my garden, but i am building the history of where i am today - and i have 4 - nay, 5 years of stuff to catch up on!

i left off with mr. sniffy... my dog - anyways, 2005 was a good year, i work for a large high tech firm in folsom and every 7 years, we get a sabbatical - which gives us 8 weeks of vacation and when i tack on my standard 4 weeks a year, i got 3 months off. a very nice perk and one i greatly appreciate.

so my sabbat (which i will now use to shorten up a word, which i can never spell correctly), started in late july with me putting the final touches on my - not fully surrounding the property fence. the next project of my laser focus was to build a shed to house the stuff, stuffed into my garage since our move to the new house in february. it took awhile, but i was able to google up some nice plans which i extrapolated from, to come up with my shed design.

the shed had to hold general family stuff we rarely look at (stuff from our younger days), stuff we pull out once or twice a year (camping gear) and also handle the task of housing my yard gear - mowers, chemicals, implements, etc - oh it also had to look nice and compliment the new house. the result was a shed that has an attic space to house the aforementioned, rarely accessed stuff and enough room to house all the other gear. they say you will fill up what ever space you have - and thats a fact. that shed is pretty well full, which will be remedied - one day with another one to house my garden stuff only - leaving the current shed for long term storage of 'stuff'. cost to build the shed, from scratch was comparable to getting one from 'tuff shed' or other local made shed - so i didnt save any money - however, this project kept me busy for quite awhile and i ended up with an attic and even a nice covered front porch on my shed - it looks more like a little house than a shed.

the shed was completed, some where in the late september time frame. project money had been tapped dry, so i had to find something to keep me busy that was low cost and useful - i still had almost a month of sabbat time and could just sit around and do nothing. thats where we start intersecting into my future garden....

the first summer - part 1

as i mentioned, we moved to the new house in february 2005. after a pretty wet spring, i got started on tasks to reshape the new yard. the house was new construction and in our area, landscaping was not included in the price.

the first project was putting up the fence. this started in march and continued until mid summer. challenges included bedrock type surface near the house, requiring a jackhammer to bust out fence post holes. fence money ran out by july and this put in fence on both sides of the house going back to the rear property line - thats right, it didnt enclose the backyard (and still doesnt). we need to keep the dog within the confines of the yard and thankfully the zappy collars that zing his neck when he gets too close to the wire which surrounds the house has proven enough to keep him at home.

as a side bar, over time we have extended the wire - essentially giving him more territory, but he has it ingrained that he experienced discomfort at a certain point in the yard. so it takes awhile for him to learn that he can go into areas that were, previously, unavailable to him. once we can coax him to a new area, he gets pretty excited to be there checking out new smells and being generally mr. sniffy for awhile. next - summer projects...

Wednesday, February 18, 2009

some background....

a little about my garden plans. i moved to diamond springs in february 2005, after living in the nearby community of cameron park for 12 years. one thing i definitely wanted in the new house was a substantial increase in gardening space. the new house sat on just over 1/2 acre and allowed me to make a huge leap in gardening space. the soil i had in cameron park was the typical red clay, common in the foothills in this region. i had good success and grew quite a bit of veges, but space was at premium and i was always trying to cram too much into my space.

my new garden is probably 3-4 times the size of my previous, but with a couple issues. instead of the rich red clay soil i had in cameron park, my soil in diamond springs was a white, porous type i have never dealt with. a geologist friend told me it was from an ancient volcanic ash flow. well, i found out it wasnt too good for veges as my first year growing tomatoes (a test) found a rather anemic result - i found out i would have to severely amend the soil here to get any production. the next 3 summers found me amending the holes i planted the 'maters in - resulting in pretty good production.

BUT, my ultimate goal was to have raised beds and so this blog will chronicle my 'raised bed' experience in my garden, among other things. It's now 2009, 5 years after i moved to the new house - why did it take so long to get the garden to this state? well, i had to get the front yard landscaped, fence in, built a shed - all manner of other things to do before i could properly tackle my 'dream' garden which will most likely be the one i will have for the rest of my life.

Tuesday, February 17, 2009

first post

well, this should kick things off with a first post. i'm not sure where this will go, who will read it or if anyone besides me will benefit from it. BUT - i have found myself enjoying others gardening blogs and thot what the heck. no guarantees on how often i will post, but hopefully often enough to make it interesting.

garry