Thursday, April 30, 2009

the next big project

once the compost bin is completed and the vegetables are in the garden - this is my next focus.

this is the lower area of the yard, which due to budget priorities, hasnt been landscaped beyond the core trees (crab apples - great spring and fall color) and bark. the plant growing on the wall is virginia creeper (great fall color) - but it doesnt do well growing on the wall - these will be pulled and replaced with boston ivy.

rocks will be placed strategically in the area and plants will be landed among the rocks. i will be using the same varieties of plants as i did in the upper yard - yellow babrberry, purple barberry, veronica, streibes findling cottoneaster - but in larger varieties than above - as the plants need to scale better with the wall and also need to 'pop' when viewed from the court. right now, my driveway looks like a nursery, as i have been accumulating plants as i find them at the local big box stores and mom and pop nurseries. i learned a few years ago - you better get the plant when you find it - or you will be wishin' you did.

the front yard...


this is the reason it took me until 2008 to really get going on my vegetable garden. this angle doesnt show too much of the wall - but if you have read my earlier posts - you kinda know what i did.

the yard is split in 2 - with 2 distinct yards, the closest in the picture, is the 'playing' lawn and the far grassy area is the 'looking' lawn. 2 boys wrestling around tends to mess up the grass a bit - so the boys keep to this lawn for their escapades - and as a result we are all happy.

the plants in the yard are yellow barberry, purple barberry, crimson pointe plums, october glory maples, streibes findling cottoneaster, japanese maple, blue fescue, veronica (green and yellow) and montgomery spruce. over all i like the way the plants tie it all together. the spruce, fescue and the lichen on the rocks all nearly match in color and provide continuity throughout the landscape. the purples in the barberry, plum trees, crab apples all blend and are boldly contrasted by the yellow barberry - which seems to glow in the twilight sun in the evening. except for the trees - all of the plants are a dwarf variety - so they wouldnt overwhelm the yard. trimming them up only requires a snip here and there throughout the season with hand pruners - no shearing for me - this yard was to be on the low end of the maintenance scale.

current project


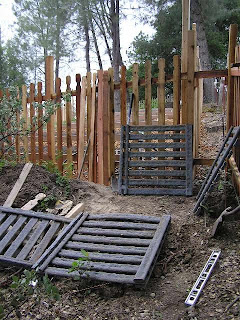
this is my current project. building my compost bins. i purchased these bins a few years before we moved from the last house. it is made of recycled plastic - extruded into plank like lengths. this was pre-trex days - and cost me about $250 for the 2 bins (only one is shown the pic).

its unrottable (new word i invented) and did a decent job at the last house.

so by the end of this weekend - i am betting i will have 2 bins ready to go. its important i get this done - as my sons first scout merit badge task is to build a compost pile and get compost in 90 days.

an orchard update


just about all of the sticks have pushed leaves. the few that havent sprouted were newly planted this year - under warranty - from the frontyard nursery - so no worries.

one thing that i have been fortunate over the last two years - no peach leaf curl! i dont know if its the drought and the resulting lack of moisture, my soil chemistry - which naturally keeps the fungus at bay. but what it allows is so far into 2 years of my orchards life - no spraying.

dont get me wrong - i will spray if necessary, but so far so good.

several of my 1 year old cherry trees and nectarine trees blossomed this year - i usually will knock the baby fruit off the first 2 years, but we will see how it goes this year.

44 trees and still looking good.

Tuesday, April 21, 2009

bare root production


ever wonder how they get the bare root trees ready for you to buy? a very interesting video - courtesy of dave wilson nursery.

http://www.youtube.com/watch?v=LLYI6MVJqsg&feature=PlayList&p=1561C9DFB701E536&playnext=1&playnext_from=PL&index=65

organic on the lawn too....


i have a real anal-retentive need for a lush, green, well-manicured front lawn.

dont know if its my nostalgia for typical 1950's era, wholesome american-ness but, its what i do. to achieve that goal i was pretty loose with the sulfate of ammonia fertilizer at the old house and when i rolled lawn at the new house, i still fertilized (once a month, on odd numbered months) - although with a better balanced turf fertilizer than sulfate of ammonia.

i used BEST brand Turf Supreme - it had relatively low n-p-k (16-6-8) numbers, as well as iron and resulted in a properly green lawn. one downside to the synthetic i was using, i couldnt use it during the hot months, otherwise i would risk burning my lawn. so by july, the lawn would be less green until late september when it was cool enough to fertilize - with no risk of burn.

i found that dr. earth had a lawn fertilizer in pellet form, which i could use. cost is roughly 50% higher than the BEST product i was using, but if it would get the lawn green - keep it green and also be better for the dirt (it even states it better controls thatch) i figured its worth a shot. the n-p-k numbers of dr. earth (9-3-8) - was roughly 1/2 of the synthetic, and with fertilizing each month regardless of summer heat, my lawn would get roughly the same amount of nutrients, on a more consistent basis. AND if its better for the lawn, its win-win again.

i started applying dr. earth on my lawn in february - and spread it after every mowing - way more than suggested - but its natural and i wanted to get the lawn/soil a boost with the natural fertilizer and mycorrhizae, in hopes we can roll through the summer - and build a base of natural fertilization, which would get me to a once a month application.

its now mid april and the lawn appears as green as the old fertilizer made it and if the roots of the lawn respond to dr. earth - like my tomatoes did last year, i might even see a decrease in watering needs - which is not bad at all (really) summer watering for me is usually 2 times per week, 15 minutes each time - with the 15 minutes busted into 3 each, 5 minute patterns on the water days - to allow zero run-off.

will keep you posted on the progress of this too.

doing the organic thing


-disclaimer- i havent been too hip on the organic bandwagon, but when presented with personal evidence to support something i usually do.

historically, i have been a user of miracle-gro fertilizer on my vegetables. why?, because it worked - and my grandpa used it so i had no qualms. who can argue with success? listening to farmer fred on the radio the past few years, he has been an advocate of dr. earth products and with the info i have gleaned i am leaning to a more balanced approach to feeding my food.

i know these are fred's paid advertisers and fred needs these to stay on the radio. lord knows i need to have my weekly gardenside chat with fred - as such, i am a believer in supporting the sponsors of my favorite radio shows. thats how they stay on the air and its a win-win symbiotic relationship for us all.

so in 2008, i used for the first time, dr. earth's organic 5 tomato, vegetable and herb fertilizer. i figured what the heck, i had nothing to lose and possibly more to gain. i applied it on a weekly basis - possibly more often than recommended - but being organic, i had no issues. i noted not one difference in crop performance - on the upside or downside; thats good so at least i know it works as well as the miracle-gro. one thing i had hoped to improve was the occurrence of blossom end rot.

i know blossom-end rot is caused by a calcium deficiency - brought on by erratic watering. although i water at 2 times a week, filling the bowls around the tomatoes several times during a watering - so i dont see my watering as erratic - but the tomatoes dont lie. i noted a high calcium content of dr. earth and thought that might improve the free-calcium in the soil, making it less of an issue for plant take up.

(btw, foliar calcium sprays probably dont do as much, if anything, as university research suggests calcium isnt absorbed thru the leaves - gleaned from ff some time ago)

well, last year i got my typical blossom-end rot, in the normal numbers - and i can usually trace it to a sharp spike in temps when the tomato was formed. so dr. earth didnt help with that. but one BIG difference i did see was when i actually pulled the plants last fall. the root system of the tomatoes were incredible. i have never seen such a well developed and spreading root system - and this was across the board for all tomato plants.

so this year i am doing it again. its dr. earth for me in the garden. everyone always has a cost threshold - and yes dr. earth is more expensive than the synthetic fertilizer i have used for years - but this year, is my first year to use my recently finished raised beds and my goal is to keep those beds as naturally fertilized as i can.

so between the dr. and my own compost i generate - i hope it will work out. will keep you posted on my results.

Monday, April 20, 2009

thier first night out

we are experiencing some unseasonably warm weather. sunday it was 90 degrees and is predicted to be close to 90 the next few days - before dropping sharply to the 60-70's (where it should be).

i have been hardening off my starts over the past few weeks, by placing them outside each morning. nights have been very cool and we had a hard frost last tuesday and as a result all of the plants have come into the garage each night - this will prevent them from getting nipped by frost, but the garage is still not much protection against the general cold. so last night, with the abnormally warm weather - i left my plants out.

its a risk, but i took it.

farmer fred states that you shouldnt leave your plants out until the nights consistently stay above 50 degrees. my temps have been in the mid forties - except for that frost last week. that frost which could have killed or severely maimed my plants. this morning we were in the low 50's so i knew we were ok.

toughen up plants - i need you ready for planting in a few weeks.

Sunday, April 19, 2009

today, i was caller #2


well, being number 2 isnt bad, particularly - when #5 is the real winner. todays garden grappler on get growing with farmer fred - was a question relating to tomatoes - 'name a tomato named after a person'.


i just happen to have had a tomato growers supply catalog handy, so perusing the pages and speed dialing the radio station, (how is that for garden geekiness - a tomato catalog handy and kste on the cel's speed dial) i was queued up and hopeful to get the coveted #5 spot. my hopes were dashed, when he tapped me as #2. my answer 'paul robeson' - which the fred described verbatim from the catalog. 'One of the most highly regarded black tomatoes, this one features medium sized deep maroon fruits that are free of most blemishes and cracking.'


well callers 1-4, got a handy dandy handout, courtesy of 'the fred' - and it is appreciated. caller #5 got a $50 gift cert for soil products at emeigh hardware - also a very nice deal. its always fun to get on the air - and in case you run across the podcast - its on kste.com - keyword farmer fred, it was in the first hour of that show.

the big frame up


lets be real, this project will taper on for a bit as i dial in details - which arent necessary to 1. either keeping the deer out or 2. making vegies green.

my plan all along was to put 2x4's along the top of the beds - it will finish the beds off nicely and provide a seating surface when i am working the bed. given my project budget - i didnt want to burn money on a portion of the garden - that was purely show and not for grow.

but i figured i would set one up to see how it looks. i was impressed - it finished off the bed, far nicer than i anticipated and now i am planning on installing the 2x4's on all beds; way ahead of schedule. it will not be a budget buster, but somethings will get delayed as a result.

on the plus side, the added height (about 1.5 inches) will go far in leveling out the dirt in the beds. when i loaded the dirt in, i mounded it in the middle, in anticipation of settling. well, the dirt didnt settle as much as i anticipated so i will have some spare dirt. and i dont want to be removing any dirt, so it looks like the bed framing project will commence - post haste.

the bark is now complete


its done, finis', kaput, all over. 17 yards later - all handthrown and up to 5 inches thick, the bark is in. 6 truck loads - glad its done. 'nuff said.

to pluck. or not to pluck - that is the question.


well, farmer fred says to let them be. my grandpa, told me to get rid of them. my personal experience leans me towards grandpas advice. what am i talking about? its whether to remove tomato flowers when the plants still havent been planted - i.e. still in pots; getting trucked into the garage nightly and out of the garage morningly (is that a word?).

pa told me the to take them off as it will probably stunt the tomato plants growth - let the plants focus on the roots. a few years ago, i missed a flower on a plant and it was a tomato about the size of a quarter before i saw it. i decided to let it go, that particular plant didnt do much until that tomato was harvested - after which it zoomed up in height and still got a decent crop from it.

what can others glean from this? well, my experience relates to only 1 plant, thats about as small of a sample as one can get - and with a sample population of 1 - the bell-curve is bit whacky - so your milage may vary. but i will continue to pluck those puppies, until the plants actually hit the dirt. sorry fred, but pa wins out on this one.


vegies on one side and deer on the other...


the fence and the gate are now in. my orchard is safe, my vegies will be safe - all is good with the world. fully enclosed, the garden is now 100% ready for the 2009 garden.

tasks are still on the list to get the garden - i still need to finish throwing bark in the garden, build the location where the future beehives will bee (heehee).

i have been trying to get back into the bee business for the last couple years, but just couldnt carve off the time. now that the garden is enclosed, i have saved an area which will be perfect for bees. i get my bees from sacramento beekeeping supply - on 21st and x, down in sacto. now that the main part of the garden project is complete i know - 2010 will be the year of bees for me!

throwin' bark...


the only local place that carries the size of fence boards i use, is lowes - in folsom. as i am still under the habit of not driving unnecessarily - picked up when gas was in the $4 range and owning a truck that gets 10mpg ( a round trip to folsom under high gas prices cost me over $20) - i decided to wait until i went to work on monday to get the boards.

so, i decided to start barking in the garden (no, i wasnt standing up there howling like a dog - i turned a noun into a verb - much like the noun-turned-verb = audibalize, as invented by john madden). i can carry 3 yards of bark in my truck and lets just say that 4 trips to the landscape yard, didnt even come close to completing the garden area.

the shot on the right shows about 1/3 of the garden barked in. i did go deep (4-5 inches thick) as i will be walking on the bark a lot and know it will get squashed down quite a bit.

Sunday, April 5, 2009

6 boards short.....

this weekend saw some decent progress on the fence, all of the posts were placed and set in concrete by friday evening, so fishing on saturday didnt hinder progress on the fence as it gave a full day for the concrete to harden up. i was out side before 8:00 am and by 8:30 i was cranking up the volume on farmer fred's show and putting in the fence.

this morning all of my boys were recruited on the project. the oldest was in charge of slathering on the thompsons waterseal on the boards and the youngest took the lead in hauling up the boards so i could cut the semi-circles at the top.

the gate is next, well - the last 6 boards too; to be exact. cedar bark will quickly follow and this portion of the garden project will be in the books. next stop, actual planting of my vege's. april 28 - 23 days away and my tomatoes go in the ground. yipee!

Wednesday, April 1, 2009

preppin' the potatoes

taking a quick look at bill bird's fledgling potato patch got me thinkin' i might have missed the bus - however, i live at 1850 foot in elevation (he is in the natomas area, so its way closer to sea level) and still at risk of a hard freeze into early may. so planting the spuds is still probably a bit early up here - however, i will risk it in a week or two.

this is the first time i have planted potatoes in over 10 years. the heavier soil in cameron park didnt lend itself to very good potato harvests, but my newly built beds with the fluffy soil is ideal for a huge harvest. i am so looking forward to home grown potatoes - i'm thinking its going to be a great fall.

in the past, i had issues w/ the seed potatoes rotting once planted. my guess is the heavy soil, in cameron park, kept them a bit wetter than optimal - but i think the major contributing factor was i didnt let the potatoes harden off when i cut them in preparation for planting. this year will be different!

this evening, i cut my 'taters and they are in the kitchen drying off on the cut end. according to the the potato flier i received from the frontyard nursery, it suggests that you should treat the cut ends with sulphur or at least let it dry for a day - prior to planting. not having sulphur handy, i chose the latter. these spuds will be set aside for a week before planting.

fencing it in....

this week i got back on task and decided that the fence was the next step. post holes dug pretty quick with no major (or minor for that matter) rocks or roots to hold up process. as you can see, most of the posts are set and awaiting concrete.

one more 8 foot post is needed as well as two, 12 foot posts that will define the entrance arbor. during the building process, i have been noodling on how i will build the gate. i have built gates from scratch with all wood and have also used a metal brace kit available at local box stores. for strength over time, the kits seem to last better than the scratch built gate, but the kit hinges tend to be less robust than what i have used in the past - even so, i will probably lean towards the kit.

tonight(4/1/09) i have a boy scout meeting with my oldest son, so thursday night will be the next chance for progress. fishing on saturday will slow progress, but by sunday evening - i hope to have all fence posts set in concrete. with a planned tomato plant date of 4/28, enclosing this garden in comes none too soon. i will feel a lot better knowing the deer have to do more than just saunter in and nibble on my plants, for an easy meal. mr. deer - your number is up, you will have to find another buffet for your meal!